
Remember back in July when I introduced you
to Veronica?
Veronica is a thrifty find from our local
Arc Thrift Store.
I paid all of $7.50 for her.

She has lived very happily on my side of the bed.
She came with a few dips and divets, mars in her
otherwise pretty face, and I decided it
was time to transform her into the true beauty
I knew she was.
I had been really wanting to try my hand
at homemade chalk paint.
There are recipes all over the web and the one I
went with consists of
2 cups paint (I used some of a gallon of
Olympic eggshell called Belgian Waffle, an off white with a tinge of yellow)

5 tablespoons Plaster of Paris
Several tablespoons of water
I mixed the Plaster of Paris
with enough water to make a paste like
consistency and then added it to the paint and stirred really well.
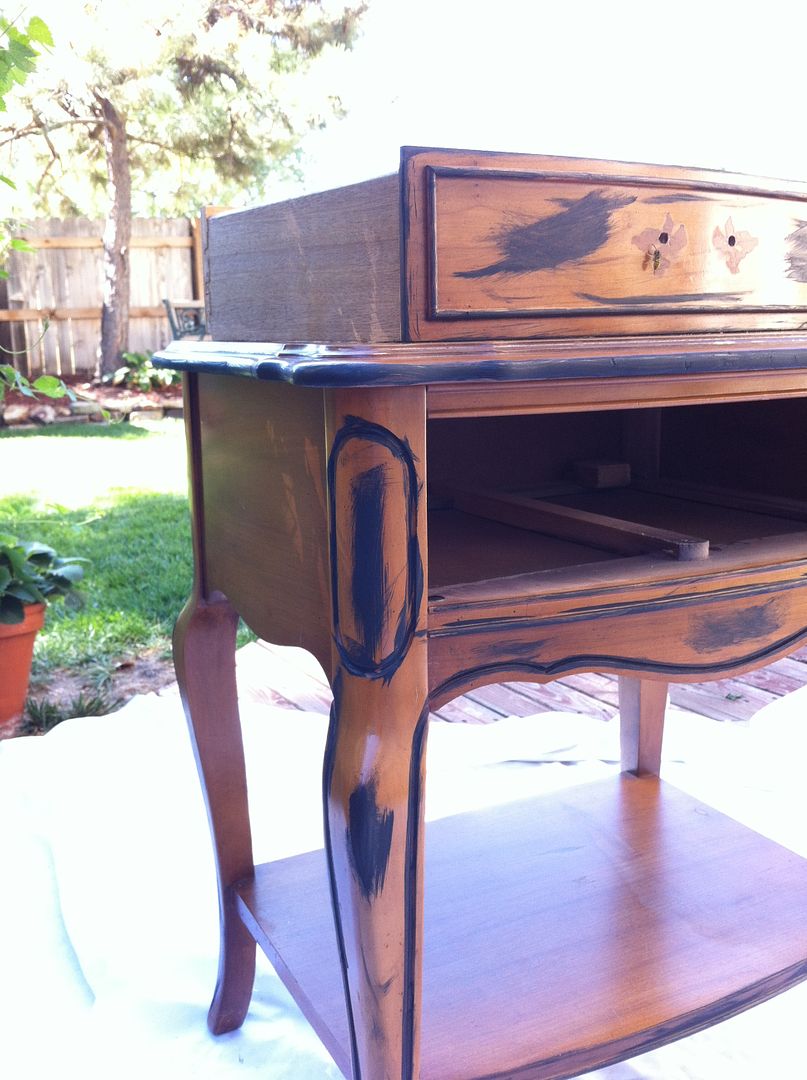
After taking Veronica outside,
I lightly brushed some black craft paint
on areas I wanted to distress later.
I dabbedgenerously some Vaseline
I dabbed
on some areas I wanted to distress later.

I may have got a little carried away
with the black paint...

I then brushed the first coat of my chalk paint
al over her, except the top.

I then went and got my nails done.
Hey, I HAD to!
I needed to let the first coat dry at least 2 hours
and if I didn't get out of the house
I knew I'd be futzing over her.
Once my nails the first coat was dry,
I applied a second coat.


I let her dry thoroughly for several days
and then took a fine grit sanding block
to the areas I wanted to distress.

(sorry for the pinkish tones of the photo.
Not sure if you have noticed but, it's getting darker
really early now LOL)
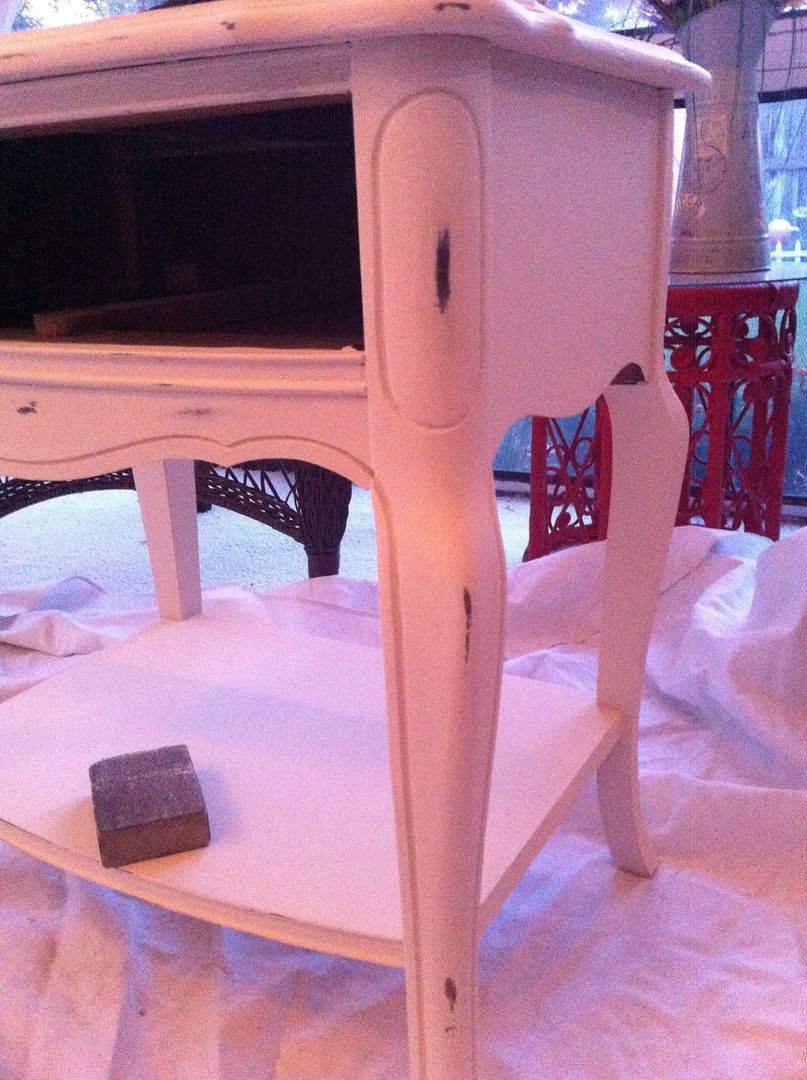
I showed great restraint in the distressing.
I just wanted it to look as though
Veronica had lived a much loved and useful life.
Next came a coat of finishing wax applied with a soft,
lint free cloth.

I left the wax on for half an hour and then buffed
with a clean soft cloth.
I applied another coat of wax a few days later.
Now it was time to attack the top.
Mr. B was kind enough to let me borrow
his orbital sander with 150 grit sandpaper.
I want one of my own and it is on my Christmas list.

(action shot)

(close up)
After sanding and giving her a good wipe down I
applied a red chestnut stain

(another action shot)

Mr. B was greatly impressed with my staining skills!
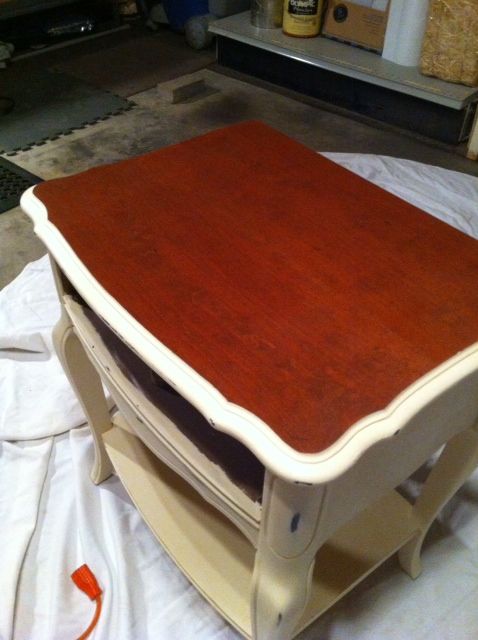
After wiping it on, I used a clean cloth and wiped off the excess.
I let her sit for a good 24 hours and then rubbed on
a coat of wax and after a half hour, buffed it off.
I repeated with another coat of wax the next day.

Done!

Look how deep and rich that stain looks!
LOVE!
LOVE!

And here is Veronica in her
natural habitat.
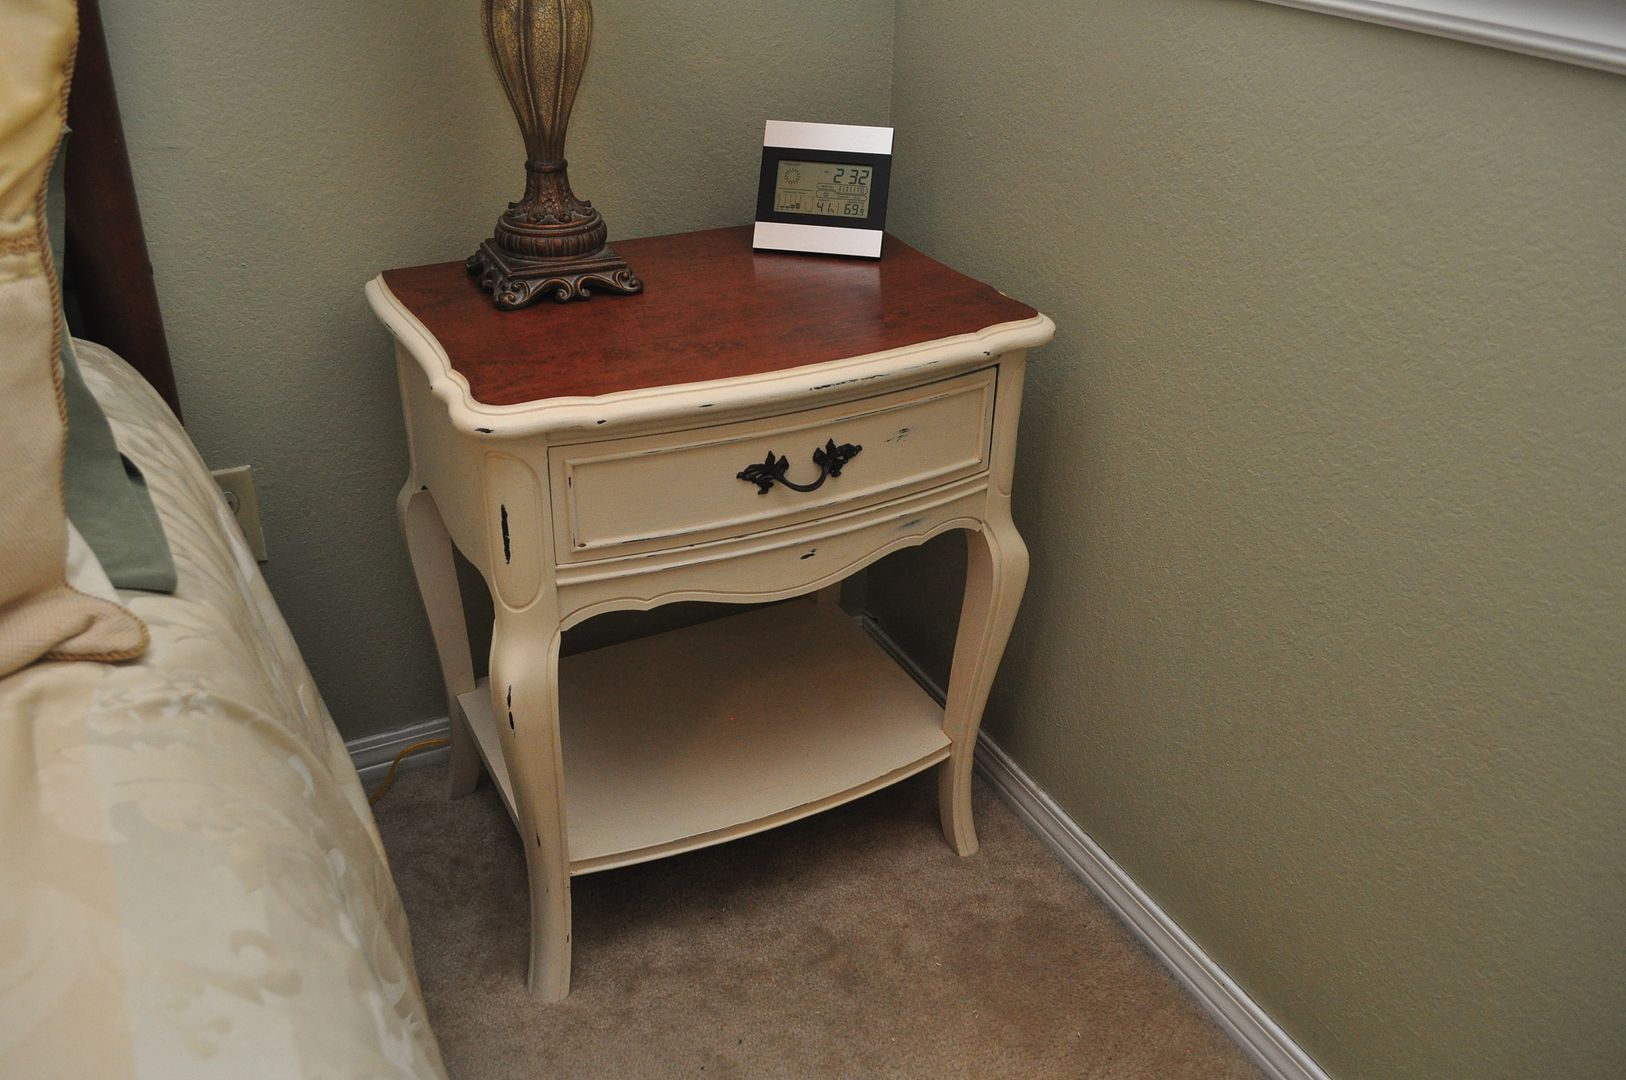

For someone that is very impatient this
project was a true lesson in patience.
It took a full week from start to finish but,
I seriously could not be more in love with how
she turned out!
The only thing I had to buy was the Plaster of Paris,
everything else we had on hand.
I already have my eye on another piece
of furniture that needs a facelift!
Click here to see where I may be partying this week.
And don't forget to come by on Tuesday's
for the link party.
And don't forget to come by on Tuesday's
for the link party.


I just love this! Paint and elbow grease are amazing!
ReplyDeletexoxo
Amie @ Pinkapotamus
Kathe, I love the night table. The extra step of staining the top made a huge difference in the table's appeal. I still don't get the vaseline and black paint thing. How did you know where the vaseline and black paint were after you chalk painted it and didn't the black paint come off too when you sanded?
ReplyDeleteYou did an absolutely beautiful job!!!!!I am looking for that type of nightstand, and if I could find the exact match to yours, I would be so, so, happy! Nah, never going to happen, but a girl can always dream, I say, lol!
ReplyDeleteLooks great, Kathe. Like a brand new piece of furniture. xo
ReplyDeleteThis is absolutely beautiful, I love the wood grain top and the painted legs...so awesome!
ReplyDeleteLove it,BRILLIANT It's just perfect. x
ReplyDeleteVeronica is Gorgeous! Great job!!
ReplyDeleteLBDH
Love it! Looks like it would have costs hundreds instead of $7.50!
ReplyDeleteI am impressed !!!! Good job !!!
ReplyDeleteBeautiful job Kathe - love the distressing, perfect amount!
ReplyDeleteAnd the wood top is just gorgeous!
All I have to say is WOW! That looks so professional Kathe! How did you learn how to do that? It looks perfect. Maybe you should go into the furniture refinishing business. have a great week my friend.
ReplyDeleteWhat an amazing transformation! It's gorgeous. I'm so impressed with your patience with the process.
ReplyDeleteWonderful outcome! You did a great job! I especially love the action shot and close up!! :-)
ReplyDeleteYou chose your accent areas wisely and I love how the top came out. I have little patience too so I know what you mean!
Well Veronica is a lucky bedside table! Look how amazing she looks with her new paint and stain! Great job! Hugs, Linda
ReplyDeleteYour patience certainly did pay off because the result is gorgeous! I guess it takes time to go from ordinary to extraordinary!
ReplyDeleteWhat a transformation! You did a fantastic job and patience (being the virtue we all aspire to have) paid off for you ten fold! I have been thinking of painting a little side table I have with ASCP. I didn't know you could make up your own. Humm....
ReplyDeleteLOVE THIS!!!!
ReplyDeleteThis is a fantastic project! That is one amazing transformation! I love the contrast of the white with the stained wood.
ReplyDeleteWould you consider linking this up at my Pinworthy Projects Party? I hope to see you there!
Okay, I love that you named her. Fantastic job!
ReplyDeleteReally, really pretty. I just love the way you did this! The top is so pretty, too!
ReplyDeleteBlessings,
Susie
Kathe, what a transformation! Veronica looks quite at home with the soft soothing colors of your bedroom. You made the project sound so easy...
ReplyDeleteDebra
what a great makeover - love the top!
ReplyDeleteBeautiful, Kathe! Love those legs on Veronica! : )
ReplyDeleteWow what a transformation! I'm in the middle of using chalk paint for the first time. But it's not going so well. I think I should have added the black paint first like you did.
ReplyDeleteYour redo is wonderful. I, too, am impatient with refinishing projects. Yours looks to fabulous, though, it should serve as a reminder that the wait is worth it. Hope you don't mind, I'm sharing this on my Once Upon a Firefly FB page.
ReplyDeletePeople who refinish/repurpose furniture are constant inspirations to me. Love the photos!
ReplyDeleteI LOVE it! I really need to get into furniture restoration, I'm loving all of these chalk paint pieces! Thanks for linking up :)
ReplyDeleteGreat job Kathe!! I seriously would not have had the patience to wait that long! It was obviously worth the wait because it turned out beautiful!
ReplyDeleteI would love for you to share this at my first ever linky party! http://www.therusticpig.com/2012/09/my-first-linky-party.html
GREAT TRANSFORMATION, KATHE. I love the stained top with the painted base.
ReplyDeleteThanks for sharing.
thanks for the explanation I can't wait to try my own chalk paint. what does the vaseline do at that step?
ReplyDeleteMY GOODNESS! You did a beautiful job here and I love the contrasting top beautiful!!
ReplyDeleteOH MY THIS IS GORGEOUS!! well done and thanks for sharing ;-)
ReplyDeleteHow LOVELY! Congratulations on a great job!
ReplyDeleteNancy
WOW! This looks great! I love it =)
ReplyDeleteThis is amazing!!! Just found you on a linkup party, love the blog.
ReplyDeleteJan @Door251
I want to do this with my 25 yr. old dining room table. Didn't know there were home recipes for it. It really ended up very nice looking! I love the color of stain you used on the top, too!
ReplyDeleteThat is an amazing makeover! I've been going back and forth between buying Annie Sloan Chalk Paint and making my own. Might have to try your recipe - I'm pinning this one!
ReplyDeleteBeautiful job, Kathe! I love this transformation!!! Veronica looks so much happier! :)
ReplyDeletexoxo laurie
Veronica looks beautiful! Great work!
ReplyDeleteThanks for linking to a Round Tuit!
Hope you have a fabulous week!
Jill @ Creating my way to Success
http://www.jembellish.blogspot.com/
Veronica turned out so pretty!
ReplyDeleteBetter than the original
for sure...
"...in her natural habitat" hee hee hee hee! Love it. Great job too! :)
ReplyDeleteI love how she turned out! Beautiful job, and good for you on holding onto your impatience. Well worth it!
ReplyDeleteSaw you sharing at NY Melrose Family
Debbie :)
Beautiful inspiration! Thank you for sharing your project at Potpourri Friday!
ReplyDeleteGorgeous transformation, Kathe--I just love how your bedside table turned out! And great minds must think alike--I just made up some homemade chalk paint, the same recipe you used, yesterday, only I painted out some pots for plants and a neat chubby urn-type container that I am getting ready to distress a little bit and then use in my fall mantel!
ReplyDeleteExcellent job! That came out beautiful!
ReplyDeleteLove it! It's just my style and just my type of project. Also that table has gorgeous curves to work with and your writing style made the post fun to read.
ReplyDeleteThis turned out so lovely.
ReplyDeleteI use the DIY chalk paint and love it. I had forgotten about using Vaseline in the areas you didn't want painted. That is an old trick we used when we used to build model cars. Yes, my name is Pat(ricia) and I used to build model cars when I first got married! That's how we spent spare time together...before kids, mortgage, etc.
...thanks for the reminder! Pat
I love it, Kathe!!! It turned out so pretty!
ReplyDeleteThanks for sharing with my Super Link Party! :-)
GORGEOUS!
ReplyDeleteYou did a beautiful job with this transformation, but I admire your patience between drying times and buffing even more.
ReplyDeletewow, this is such an awesome idea!! definitely gonna have to replicate this one!
ReplyDelete<3 Bethany @ The Sepia Puppy
(thesepiapuppy.blogspot.com)
That turned out wonderful Kathe! It looks so pretty, nicely done!
ReplyDeleteOooh, very nice. I love the way it turned out. Thanks for sharing!!
ReplyDeleteKatie
www.funhomethings.com
Truly lovely!
ReplyDeleteHi Kathe,
ReplyDeleteVeronica is so lovely now! What a great job. I found you through MRL's linky party and I'm your newest GFC follower. Hope you can stop by for a visit sometime and follow back. Have a great weekend!
Tuula :)
great makeover it really makes a total difference in the piece! love the wood and painted look!
ReplyDeleteWow I love the transformation. I'm your newest follower. Come check out my blog when you have a minute at http://sister-number-5.blogspot.com
ReplyDeleteWow! I love how she turned out. First of all, congrats on a great thrifty find - nothing makes my day more than finding a wonderful deal {usually at a thrift store}. I'm glad your homemade chalk paint turned out better than my first attempt. You did a fabulous job and I'd love to find another piece and follow your example - it turned out so beautifully. Found you at What-About.co!
ReplyDeleteKathe, she is a real beauty! I love how you have the black showing through. wish I would've taken the time to paint a bit of black under my houndstooth table. Too lazy, was I! Thanks for sharing her in all her glory with SYC. By the way, I love that you named her.
ReplyDeleteHugs,
Jann
You have been featured on Creative Corner Hop. Be sure to grab the "Spotlight is on You" button from the right hand sidebar of my blog. Thanks for sharing with us.
ReplyDeleteSandy
Cherished Handmade Treasures
It's FABULOUS Kathe!!! It turned out PERFECT!!
ReplyDeleteThanks so much for sharing this at The DIY Dreamer.. From Dream To Reality! Can't wait to see what you link up this evening!
Congrats! You were the most clicked link last week at The Kurtz Corner! I hope you'll stop by, grab a featured button and link up again! :) http://www.thekurtzcorner.com/2012/09/tuesday-tutorials-link-party-no-49.html
ReplyDeleteThanks so much for sharing this amazing transformation on Simple & Sweet Fridays. I know you inspired us all.
ReplyDeleteJody
You've been featured! Thanks for linking up at Wednesday Whatsits. http://www.whitelightsonwednesday.com/2012/09/wednesday-whatsits-27.html
ReplyDeleteKathe,
ReplyDeleteVeronica turned out beautiful! I love the new look. Thanks so much for linking up to Creative Thursday. Can’t wait to see what you share this week. Have a great week.
Michelle
Gorgeous Kathe! What a fabulous find and I love the stain on top! Featuring tonight at Mom On Timeout!
ReplyDeleteso very pretty Kathe! I love stained and painted furniture!
ReplyDeletegail
Just shared this on Facebook, pinterest and twitter as one of this weeks Five Faves at Freedom Fridays!!
ReplyDeleteHave a great weekend!
This is so gorgeous! I'm featuring this on my blog:
ReplyDeletehttp://www.maidendshade.com/2012/09/youve-got-it-maiden-dshade-19.html
Thank you so much for linking up to the party!
Kim
Really a great job! I particularly like The contrast between the white paint and the upper.
ReplyDeleteLucia
Your patience paid off...great look, love the beautiful wood top....it just made the whole look.
ReplyDeleteBeautiful job Kathe, I love the stained wood top.
ReplyDeleteJulie
Looks so awesome! I would love to do this with my desk in my office! Thanks for sharing!
ReplyDelete~Chelsea @Married Filing Jointly
http://www.marriedfilingjointly.blogspot.com
Beautiful job!
ReplyDeleteOhhh, I love it! Beats paying hundreds of dollars for a new piece of furniture!
ReplyDelete